
Building a Boxed Diorama
101st Airborne Division: Normandy 6th June 1944
By John Ballard
The plan for this diorama started off as a vague idea to build the interior of an old barn. It’s inspiration being the superb works of Shep Paine. As the idea took shape then the inclusion of a group of paratroopers materialised as the subject matter. The choice was made to work at 1/35th scale since this gave a large scope for acquiring figures and accessories that could be included and or modified to fit the scene.

1. Building the barn floor
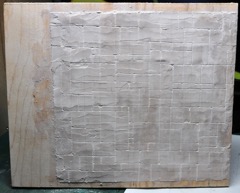
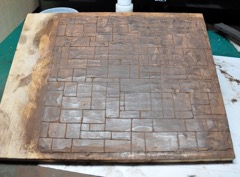
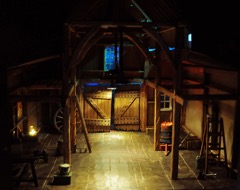
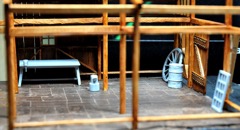
The base of the diorama is a piece of half inch ply wood about 10 inches by 11 inches. I wanted to leave a small space at the back to hold batteries etc. So the barn itself measures about 9 inches square. As the basis of a flag stone floor I applied a coat of hydrocal (plaster of Paris) to the plywood. This plaster was pre coloured with some brown pigments. The next step was to carefully scribe the flagstones into this base. The rough finish of the plaster helped to give a textured look to the resulting stones. The final step for the floor was to cover this with dry brown pigment in order to fill the gaps between the stones and to produce a darker final finish. This pigment was pushed into the gaps until a complete coverage was obtained then a couple of sprays with Tamiya X20 acrylic medium was applied to fix everything. When dry this was gentle rubbed over with a fine soft scouring pad in order to produce a semi-shine.
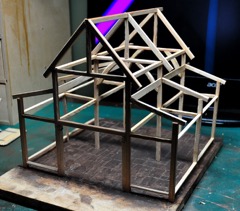
2. Framing the barn
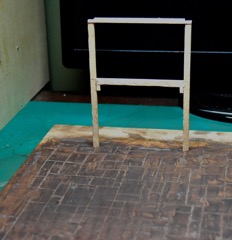
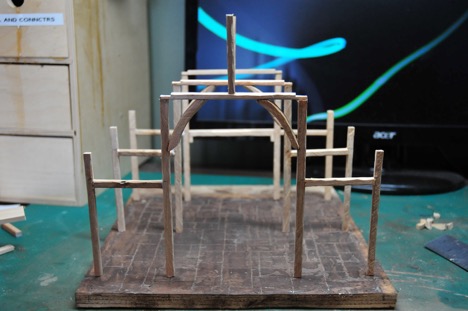
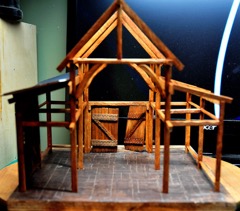
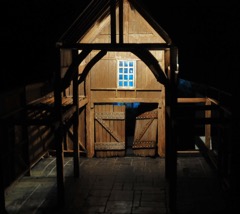
The next step was to start to frame in the barn. I wanted to recreate an old style barn so, after looking at a few photos, I decided to build a fairly high structure with almost church like roof gables. I also decided that the main entry doors would be at the back of the diorama. I therefore started with the construction of the rear wall. This was constructed from approx. ¼ inch square hard wood. The curved beam supports were cut on a bandsaw and sanded to shape. Once the frame was constructed it was all stained with an acrylic wood stain to give an aged look of pine. Now the biggest challenge was to construct the barn walls and roof whilst retaining enough access space to install the lights, figures and accessories after the construction. I therefore decided that I would build several wall and roof sections without attaching them to the frame so that they could be removed and replaced as required. I also constructed a pair of barn doors from Popsicle sticks and coffee stirrers, with nail heads made from punched disks of plastic.
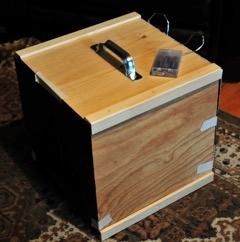
3. Box container
I now proceeded to construct the outer box from more plywood simply screwed together. I adjusted the interior of this box so that the model itself would fit tightly inside and not rattle about.
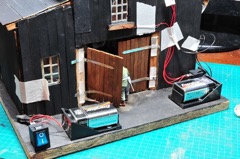

4. Lighting
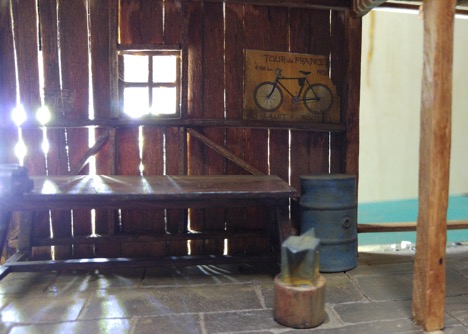
I wanted to experiment with lighting the scene. I chose to use battery powered LED lights for this job since they are very cheap, last almost forever and do not generate noticeable heat. The general plan was to have three lighting sections. Blue coloured lighting outside to suggest a moonlit night. Warm yellowish lighting in the barn to complement the blue exterior, and finally a small fire in an oil drum just to add a flicker of movement to the scene. To introduce the exterior light into the barn I wanted appropriate windows in the rear wall and some sort of sky light. My first experiments were to check if the lighting would come from the right or the left and to see how the blue light would appear. I used some blue plastic gels to colour the exterior lights. One technical aspect that followed on from my choice of lighting was that I decided that the external lights would be fixed to the outer box, and the internal lights would be attached to the model itself. This required two battery sources since I wanted to be able to remove the model from the box without plugging and unplugging wiring. In addition the external lights only required a 4.5 volt power source whereas the internal lights were all 9 volt. For the internal lights the small flickering fire effect was wired and powered separately from the regular lights simply to avoid the flickering mechanism affecting the general illumination. This gave me two 9 volt circuits and one 4.5 volt circuit.
As the wall sections and roof panels were constructed various test were undertaken to check the lighting. I wanted the upper section of the barn to remain in shadow, to add to the impression of height, and I wanted the general lighting to produce a distinct foreground, middle ground and background. This gave rise to three main internal lights and one small lamp off to the side. Having decided on the lighting plan it remained just to fabricate appropriate fittings. These were made from tin sheet taken from a commercial pie packaging, cut into a circle and then folded into a cone shape for each general fitting. The small lamp was made by melting a piece of clear plastic rod and pushing it into a bulb shape. This was then drilled from the bottom and a small LED inserted into it. The whole thing was then given a coat of transparent orange paint to dim it down and to colour the light.
5. Accessories
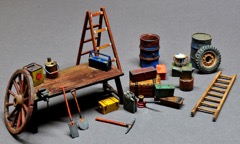
I used a plastic figure set from Tamiya to get a number of tools, oil drums etc, and I had a few other pieces found in my spares box. All of this with the intention of making the barn look lived in and cluttered. I also found some images of old French posters to decorate the walls. It was just a job of set decoration to place these odds and ends around the interior.


6. Figures
I wanted to depict a number of paratroopers and some local French resistance fighters meeting up inside the barn. I found a number of suppliers of paratroop figures. Each figure was then constructed swapping arms, legs and replacing the heads with appropriate models from Hornet. The French figure leaning against the ladder needed to have his legs cut and rebuilt in order to give the correct pose. The other figures were mostly just animated by choosing alternative arms etc. I had a basic idea of how these would be placed, but a little final adjustment was done to ensure sight lines were optimised.


7. Finishing
As a final touch I found an image of an evening sky with some silhouettes of trees to stick on the back wall of the outer case. I cut a square of Perspex to make the front window of the box and then attached a sheet of self-adhesive cork to the Perspex to provide the right shaped viewing window.